
Attributes are displayed in your store on product pages and offer general information about them. Use attributes to quickly add that information that applies to a large number of products. For example, in a large online bookstore, you can add attributes like “publisher” or “cover type” as all books are published by a publishing house and have a cover.
To add new attributes, in the main menu, go to Products section, Attributes option and follow the steps below:
- Choose the right type of attribute
- Add a new product attribute
- Add the attribute’s options
- Add a template
Choose the right type of attribute
- Click on the Create attribute button
- Choose the Attribute Type based on how you will use it in your store
- Click on the desired attribute type and enter the information following the instructions below.
After creating an attribute, you cannot change its type.
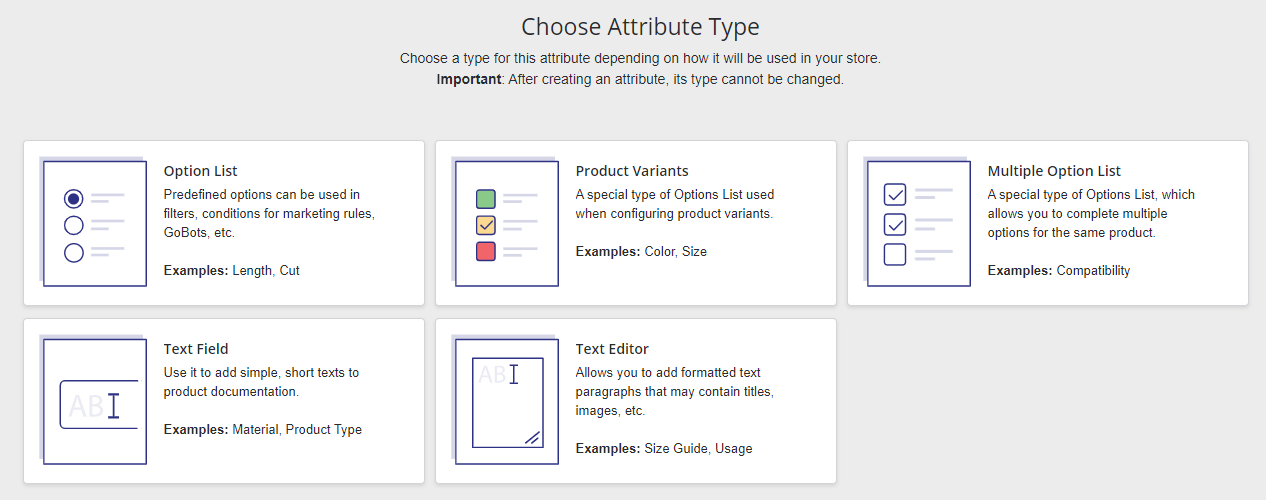
The "Options list" type is used when you apply the same attribute to a large number of products, but with different values and with a single value/product. For example, in the case of an online bookstore, the attribute can be "Publishing house" with the options "Penguin", "Macmillan Publishers", and "Simon & Schuster" because a book is published by a publishing house.
The "Product variants" type is used when configuring product variants. For example, a store which sells t-shirts can add the attribute "Colour" with the "White", "Black", "Green" values, as a t-shirt can be white, black but also green.
The "Multiple option list" is suitable for filling in the multiple options for the same product. For example, a store that sells chocolate can add the "Contains" attribute with the "Hazelnuts", "Cream" and "Fruits" values because a piece of chocolate can contain both hazelnuts and fruits.
The "Text Field" is suitable for short attributes with a reduced number of characters. For example, a store that sells clothes can add the "Fabric" attribute (because all products are made of a specific fabric), with "cotton" as a default value (because the vast majority of clothes are made out of cotton).
The "Text editor" type is suitable for adding formatted text paragraphs, including titles, images, etc. For example, a store with handmade products can use the "How it's made?" attribute with the "This product is manufactured using traditional methods and natural ingredients of local origin" default value.
Add a new product attribute
Fill in the following general information about the new attribute:
- Name - Enter the name for the new attribute, keeping in mind that it will be visible in your store.
- Description - Write a short description for the attribute so that you can easily remember what it refers to.
- Default value (only for "text field" and "text editor") - Enter the value you use most frequently. Thus, when you add this attribute to a product, you don't need to write the value if it is not different from the default one.
- Default validation - (only for "list" and "multiple option list") - Choose from the drop-down menu the options that need validation.
- Display mode (only for "product variants" type) - Choose one of the 4 methods based on which the attribute will be displayed in your store's public area.
- Use in the rule system (only for "product variants" and "multiple option list") - Decide if the attribute will be available as criteria for defining price rules.
- Display in product details - Choose if the attribute will be displayed in your store's public area, in the details page of the product. If you choose "No", the attribute will be visible only in the dashboard.
- Position in product details - Choose where, on the product page, to display this attribute.
- Display in - Choose if you want to display this attribute in order details or on the invoice and order print.
- Add to order - Choose if you want to display the attribute in the order.
- Position - Enter a value that will determine the order in which the attributes are displayed on the product page.
Add the attributes options
Suppose you've selected one of the "options list", "product variants", or "multiple option list" types after you’ve filled in the overview. In that case, you will need to enter the variants/ options for the attribute from the "Options" tab as follows:
- Display position - Choose the order in which the attribute's options will be displayed on the product page.
- Options - Here, you'll enter the attribute's options by filling in the text field. Then click on the "Add Option" button. You can upload images for each option, and you can delete the ones that are not necessary.

Add a template
A template is, basically, a way of grouping all products that have the exact attributes. You have available the “General” type for starters, but you can add a template if you click on the Create Template button. You will be prompted with a pop-up in which you need to enter the name for the product type and choose the attributes that apply. When you finish, click on the Save button.
Once you create the desired template, it will be displayed in the list under the pre-existing one (General), and you can check it so that the attribute you are creating applies to all products of this type.

After you enter the attribute’s details, don’t forget to save your work. Click on the Save changes button from the top-right of the screen.
Comments
0 comments
Article is closed for comments.