With the Blog module's help from the Gomag platform, you can publish articles directly from the platform without the need for a separate blog or subdomain.
To publish articles in your Blog from the Gomag platform, we recommend you perform some initial settings. To perform these settings, go to Content, Blog from the main menu.
- Establish the initial settings
- Configure the layout of the homepage
- Create blog categories
- Publish an article
- Advanced editing of an article
- Social Shares for your Blog
- Add a post on product pages
1. Establish the initial settings
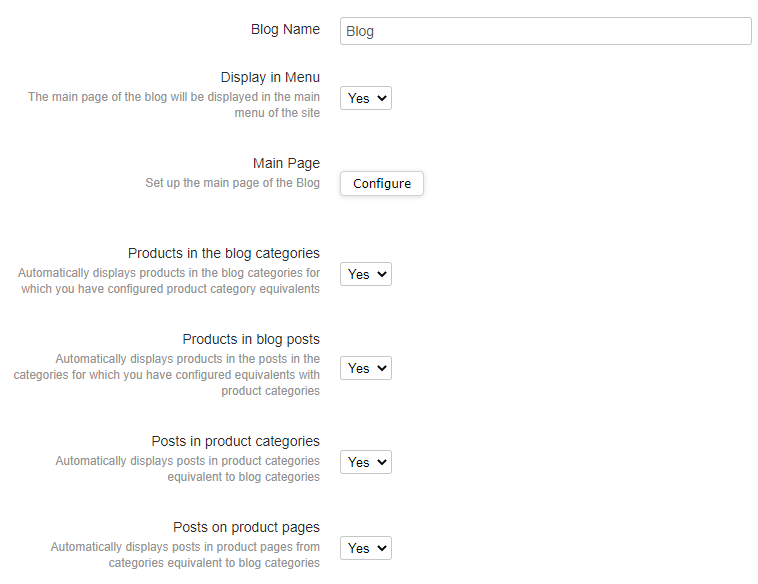
To establish the initial settings for your Blog, click on  from the top-right side of the screen. Here you will fill in the fields based on what you want to happen with your Blog's articles.
Blog name - Give your Blog a name.
Display in Menu - Choose if the Blog's main page will be displayed or not in the store's main menu. We recommend you choose Yes.
Homepage - Here, you can configure the Blog's homepage. See how you can do this in Configure the display of your homepage section.
Products in blog categories - Set if in the Blog's category pages you want to display products from your store's equivalent categories.
Products in blog posts - Set if you want to display in your blog posts products from your store's equivalent categories.
Articles in product categories - Choose if you want to automatically display articles in stores’ categories equivalent to blog categories.
Articles in product pages - Decide if you want to automatically display posts in product pages from store categories equivalent to blog categories.

2. Configure the layout of the homepage
When you click on the Configure button in the Blog settings, Homepage section, you will be prompted with an editor similar to the one used in creating landing pages.
Upfront, you have 2 sections - The page Title and the Homepage blog. The homepage blog lists items on the left side and the listing of blog categories on the right side.
Click on  in the top of the page and enter the necessary information.
Page name - “Blog” is enough.
Visible - Choose if the blog is visible or not or if it’s visible only in a particular time interval.
Display in the menu - Choose if you want or not to display in the menu.
Position - Choose the page position displayed in the menu.
Background colour - Choose the background colour, preferably white.
Image - You can upload a background image.
Repeat background colour - If you choose a background colour, you can set for it to repeat itself as visitors scroll to the page.
Anchor name - “Blog” is enough.
Page title - Meta title for the blog’s homepage.
Page description - Meta description for the blog’s homepage.
If you make these settings, your blog can now function. However, you can also add additional functions using the advanced editor. If you click on Add a section, you can personalise the blog page based on your needs.
You can add content, banners, videos, testimonials, forms, reviews and even a product list. However, you need to think about how you would like your blog’s homepage to look and not overload it.
3. Create blog categories
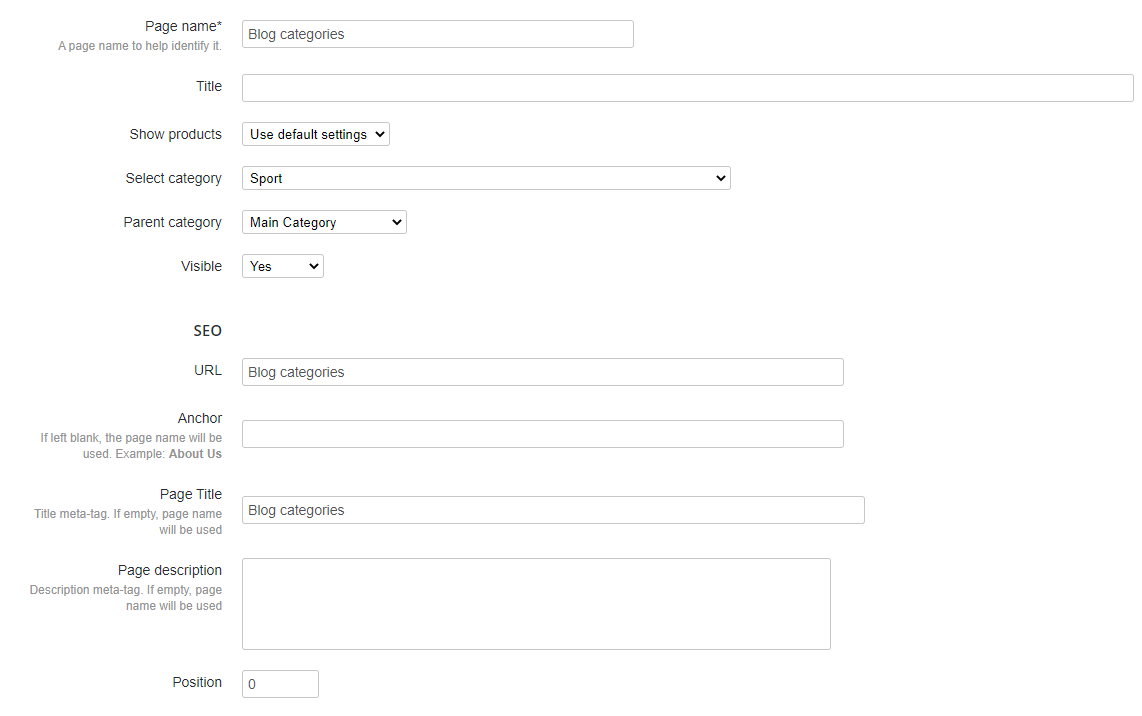
Before you write your first articles, we recommend you create your main blog categories. Go to the Content, Blog section in the main menu and click on Categories in the top-right and Create Category button. Here you will need to fill in:
Page name - Enter a name for the page to help you identify it.
Title - Enter a category title.
Product display - Set if you want to display products from equivalent categories from the store. You can leave the default settings or you can manually change with Yes / No.
Choose category - Select the store’s category you want to equivalate the blog category with.
If in the blog category, you intend to write more about tips for bedroom decoration, choose the furniture or decoration for the bedroom category from the store.
Parent category - Choose if this category you are creating is a main category or a subcategory for one of the categories previously created.
Visible - Choose if this category will be or not visible or visible in a specific time interval.
URL - Enter the category’s name.
Anchor - Enter the name which will be displayed for the links that indicate towards this page. If left blank, the name of the page will be used.
Page title - Category’s meta title.
Page description - Category’s meta description.
Position - The position in the category listing.

4. Publish an article
To publish an article, click on Add a post button on the screen's top-right and enter the information.
Title - Enter the article's title.
Content - Paste here the text from the Notepad. Here you can edit:
- You can set the format of the paragraph and apply H1 - H3 for subtitles.
- You can use bold, italic and other designs on the selected texts.
- You can choose any colour you want for your text..
- You can change the font size.
- You can align and create numbered lists for the selected text.
- You can add links to the selected text.
- You can add images, tables, etc.
The main page - Upload an image from your device.
Display products in articles - You can leave the default settings, or you can set them based on the article.
Author - Choose from the registered users in the admin. If you don't choose an author, the icon and the author's name will not be displayed in your articles.
Blog category - Check the blog category you wish to link your articles or create a new category.
Tags - Here, you can add one or more keywords (for example, the name of the products mentioned in the articles). Tags are useful when you want to add in product pages, only blog posts with a specific tag.
Visible - Choose if you want to make the article visible or not or visible only in a time interval.
URL - Enter a simplified title article and separate the words by dashes.
Page title - Article's meta title.
Page description - Article's meta description.
After you enter the information click on the Save button.
5. Advanced editing of an article
After you’ve followed the steps from section 4 and saved the article, you can further edit it in advanced editing. To do so, click on the Advanced button next to the title.

You will then enter the advanced editor for the article. If you click on the Add section, you can personalise the blog article as you wish.
You can add content, banners, videos, testimonials, forms, reviews and even a product list. However, you need to think about how you would like your blog’s homepage to look and not overload it.
After you add the sections, don’t forget to click on the Save button.
See HERE more information and tips & tricks about blog posting.
6. Social Shares for your Blog
To share your blog posts from the Gomag platform, you need to enable the ShareThis app. See HERE how you can enable and configure the app.
7. Add a post on product pages
To add a blog post on a product page, follow these steps:
Step 1: In the main menu, go to the Content section and select Blog.
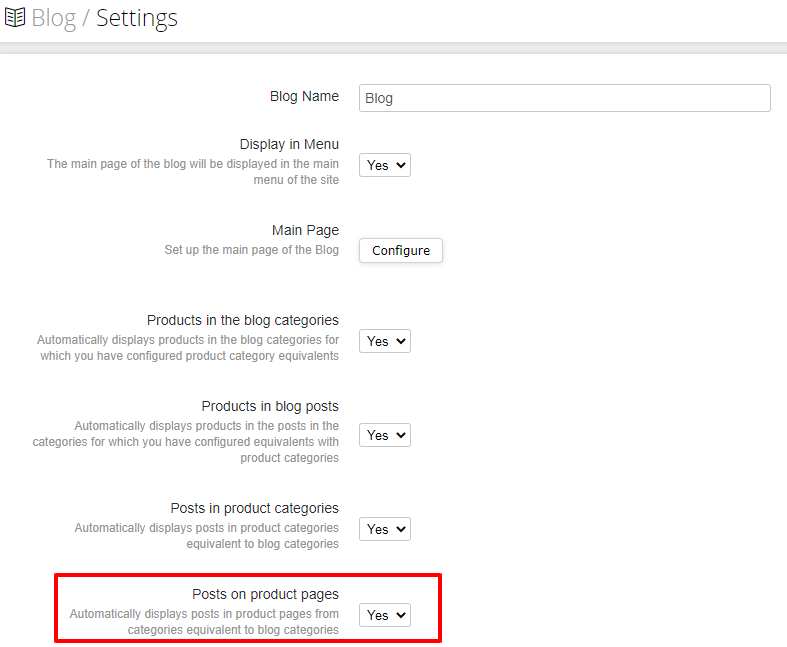
Step 2: Click on the wheel icon  from the top right of the screen.
Step 3: In the Settings page, choose the option YES for Posts on product pages section.

If you do not choose the option YES for Posts on product pages, the tab Blog will not be displayed in the product editing section.
Step 4: Add or modify a blog post.
If you choose to add a new blog post, click on the Add post button and enter the necessary information. See HERE all the details that you need to fill in. In the Tags section, enter the tag that you will add in the Blog tab in product editing.

If you choose to edit an existing blog post, click on the three dots  from the article's right side. If the advanced editing opens, click on the wheel icon
  next to the title. A pop-up window with settings will open. In the Tags section, enter the tag that you will add in the Blog tab in product editing.
Step 5: Go to the Products section and click on the three dots  next to the product to add the blog post.
Step 6: Click on the Blog tab and enter the Tag you’ve attributed to the article.

Step 7: Click on the Save button.
Comments
0 comments
Please sign in to leave a comment.