
In the main menu, go to the CRM section, Customers option - here, you will find a list with all customers that have purchased from your store. You can also manually add a new customer.
Add a new customer
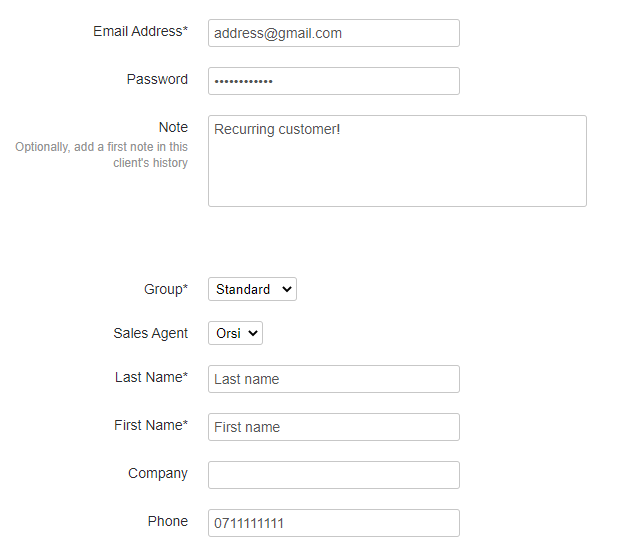
To add a new customer into the database, click on the Add Customer button, which you can find on the top-right of the page and enter the following information:
- Email Address - Enter the address that the customer uses to log into the store.
- Password - Enter the password that the customer uses to log into the store.
- Note - Optionally, you can add some additional information about the customer in this field.
- Group - Choose a group in which you allocate the customer, you have "Standard" or "Business", or choose one that you've created (see the article Group of customers).
- Sales Agent - Attribute Sales Agents to customers
- Last Name - Enter the customer’s last name.
- First Name - Enter the customer’s first name.
- Company - Enter the company where your customer works if you have this information.
- Phone - Enter the customer’s phone number, if you know it.
Edit a customer
As an administrator, you can edit your customer’s information from your online store. To do so, go to the CRM section, Customers and click on the three dots next to the customer you want to edit.
A new page will open where you can see:
1. History - The date when the customer registered with the store, when he placed his first order, when and how many orders he placed, notes you’ve added for this customer. You can also add new notes.
2. Customer details - Here, you can see the group assigned to the customer. You can add Tags to the customer, for example "RECURRENT", "PROBLEM", etc. These tags will help you segment your customers based on the assigned tag. They will help you offer discounts in the shopping cart based on the given tag. Also, you can create rules for Email Bot, CRM Bot and Orders Bot.
You can add tags in the CRM section, Customers, customer edit, Details section. Or you can do so with the help of a CRM Bot.
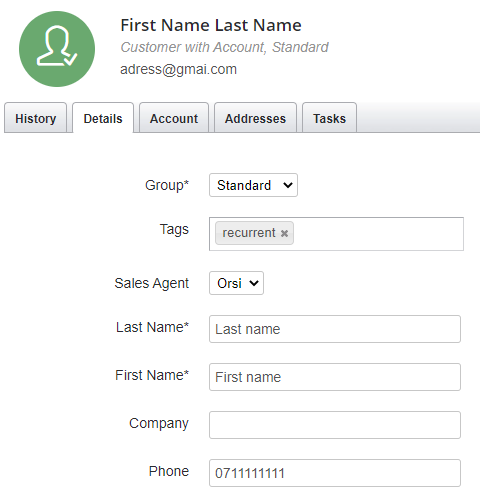
You can see the name of the agent, the last name, the first name, the company's name, and the phone number.
3. Customer account - You can see the account's status, Enabled or Inactive, and the email address used when the account was created.
4. Customer Addresses - You can see the address(es) that the customer entered at checkout. Here, you can add a new shipping address or a new billing address for the respective client.
5. Tasks - You can see or add tasks that you need to fulfil for this customer. Also, you can add the respective action that you need to perform for the customer in the calendar.
Full customer list
The customers are displayed in a table that you can organise based on name, in alphabetical order or vice versa (click on Customer column). The table has the following columns:
- Customer - Features the last name, first name, the group assigned and email address
- Company - Features the name of the company attributed to the customer's account.
- Tags - Features the Tags attributed to the respective customer
- Modify and Delete options - Use them when you want to change a customer’s information or to delete him from the database
Customer Search
On the top of the Customers page, you have the option for a quick search of a specific customer from the list, based on the following criteria:
- By name or email address - Enter the customer’s name and email address in the Customer box and click on the Search button
- By customer type - You can select Customer with Account or Customer without Account
- By group assigned to the customer - Select from Customer Groups, one of the existing groups, then click on the Search button.
- By attributed tag - Select from the Tag field one of the current tags, then click on the Search button
If you want to abandon the search and the selected filters, click on the Delete filters button. You will then be prompted with the complete list of clients.
Comments
0 comments
Article is closed for comments.